How to Photo the Aug 21st Total Solar Eclipse

Note: I originally wrote this for the Lens Rentals Blog and can be found here: https://www.lensrentals.com/blog/2017/07/guide-to-photographing-the-solar-eclipse-on-august-21st-2017/

On August 21st, 2017, a solar eclipse will be happening throughout the United States, which has created a lot of excitement and questions from our readers and customers. As a result, I wanted to put together a small guide on how to properly and safely photograph this incredibly rare event. Let’s get out and photograph the first full solar eclipse in the United States since 1991! But before you run out and point your expensive DSLR directly at that big ball of fire we orbit, maybe we should talk about safety, what’s happening, and gather some equipment first. Cool?

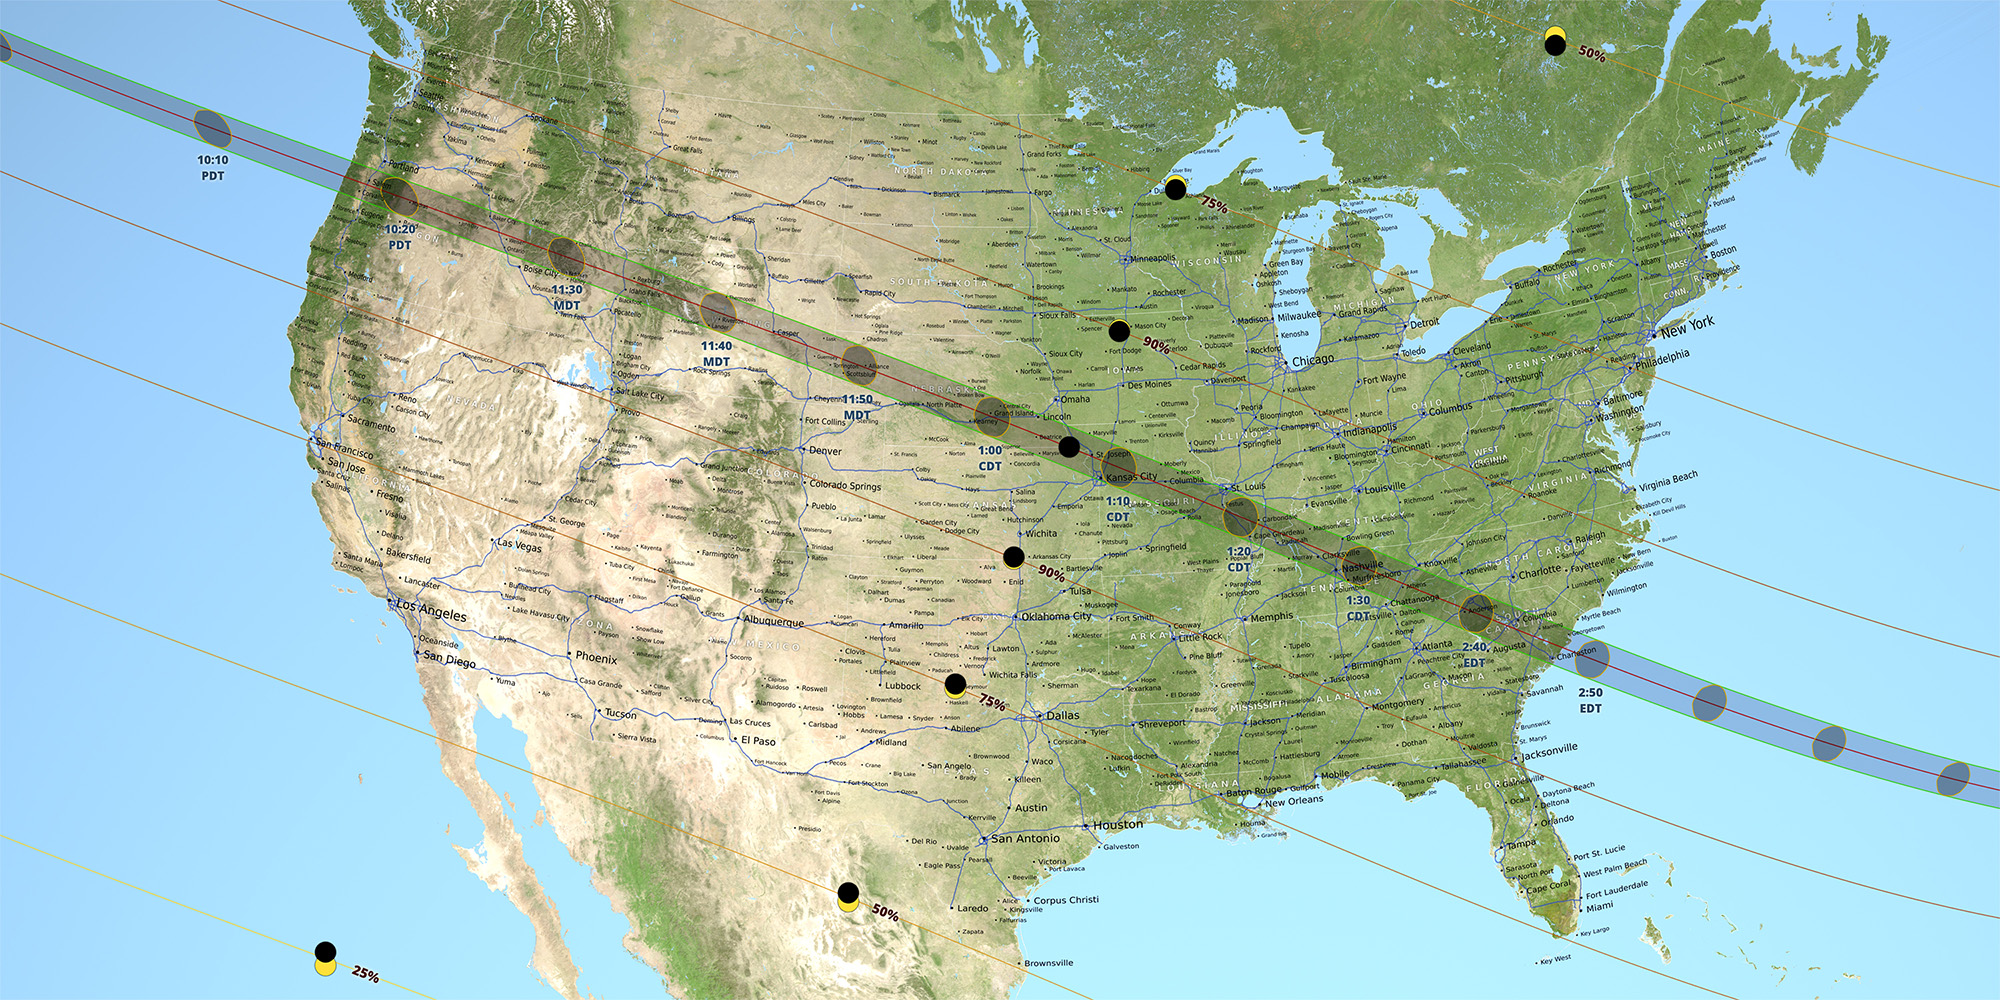
Ok, so what’s happening? On Aug 21st, 2017 the sun will disappear behind the moon totally eclipsing the sun. This will effectively cast some degree of twilight across the United States and especially in the path of totality. The path is about 70 miles wide and extends in a straight line from South Carolina to Oregon. The last time the United States saw a coast to coast total eclipse was in 1918. The eclipse duration is about 2.5 plus hours long with totality lasting up to 2 minutes and 40 seconds in some locations. What’s really exciting about this is you will be able to view the suns corona with the naked eye during totality. This time around the United States is the only country that will be able to view this eclipse in its entirety.

The eclipse starts and ends at different times depending on your location. Wanna know more? Space.com has an excellent guide including eclipse start/end location time charts.

Safety

WARNING: Permanent eye damage will occur if viewing the sun either directly, through binoculars, through a telescope, or through the view finder of your camera. Never view the sun directly without solar viewing glasses.

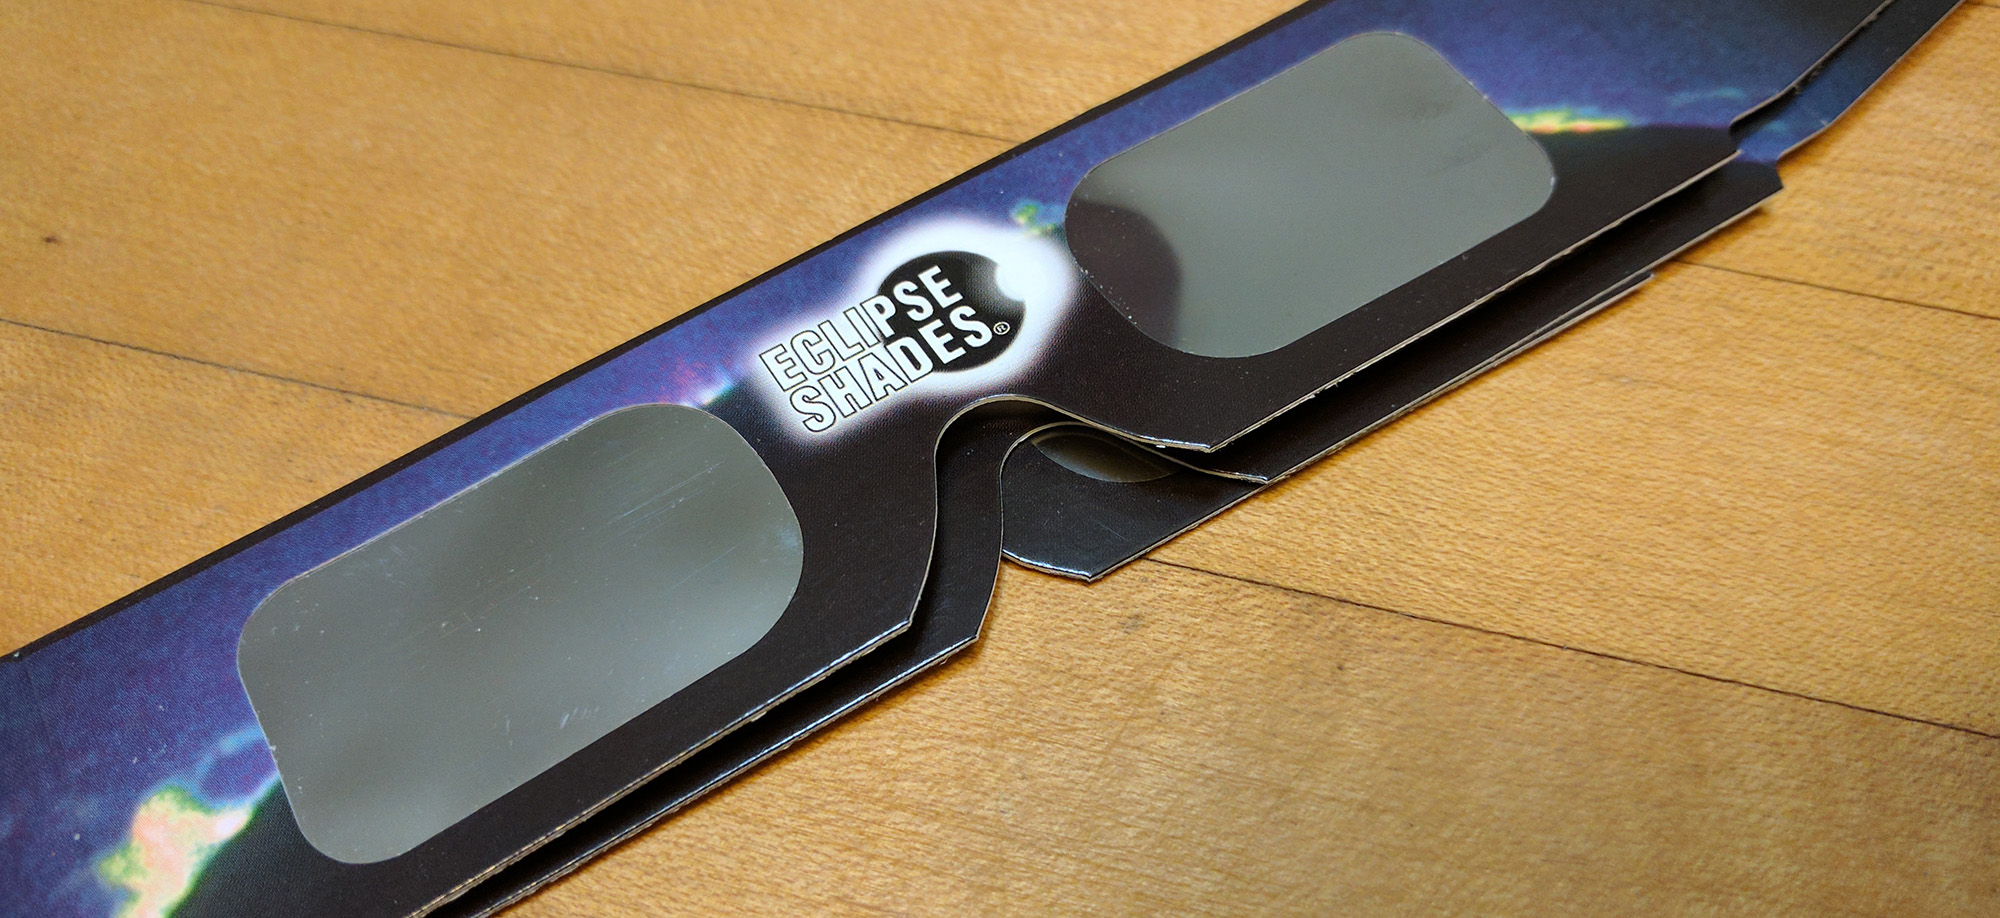
The first and MOST important item in your bag should be eclipse viewing glasses. It’s paramount that you protect your eyes at all times when looking at the sun. They are cheap and you can get a ten pack for about 15 bucks on Amazon. I’ve used these for years and have never had a problem. Finally, don’t forget other items to make your adventure more enjoyable like a small chair, umbrella, sunscreen, water, snacks and a hat.

Location of Eclipse

Your success of eclipse will depend on your location within the United States. While the eclipse will be seen throughout the entire United States, the best viewing spot of the eclipse occurs through Salem, Oregon down through Charleston, South Carolina. Use the map below as a reference guide, and if you’re able to increase your magnitude, take the extra effort to make it happen.

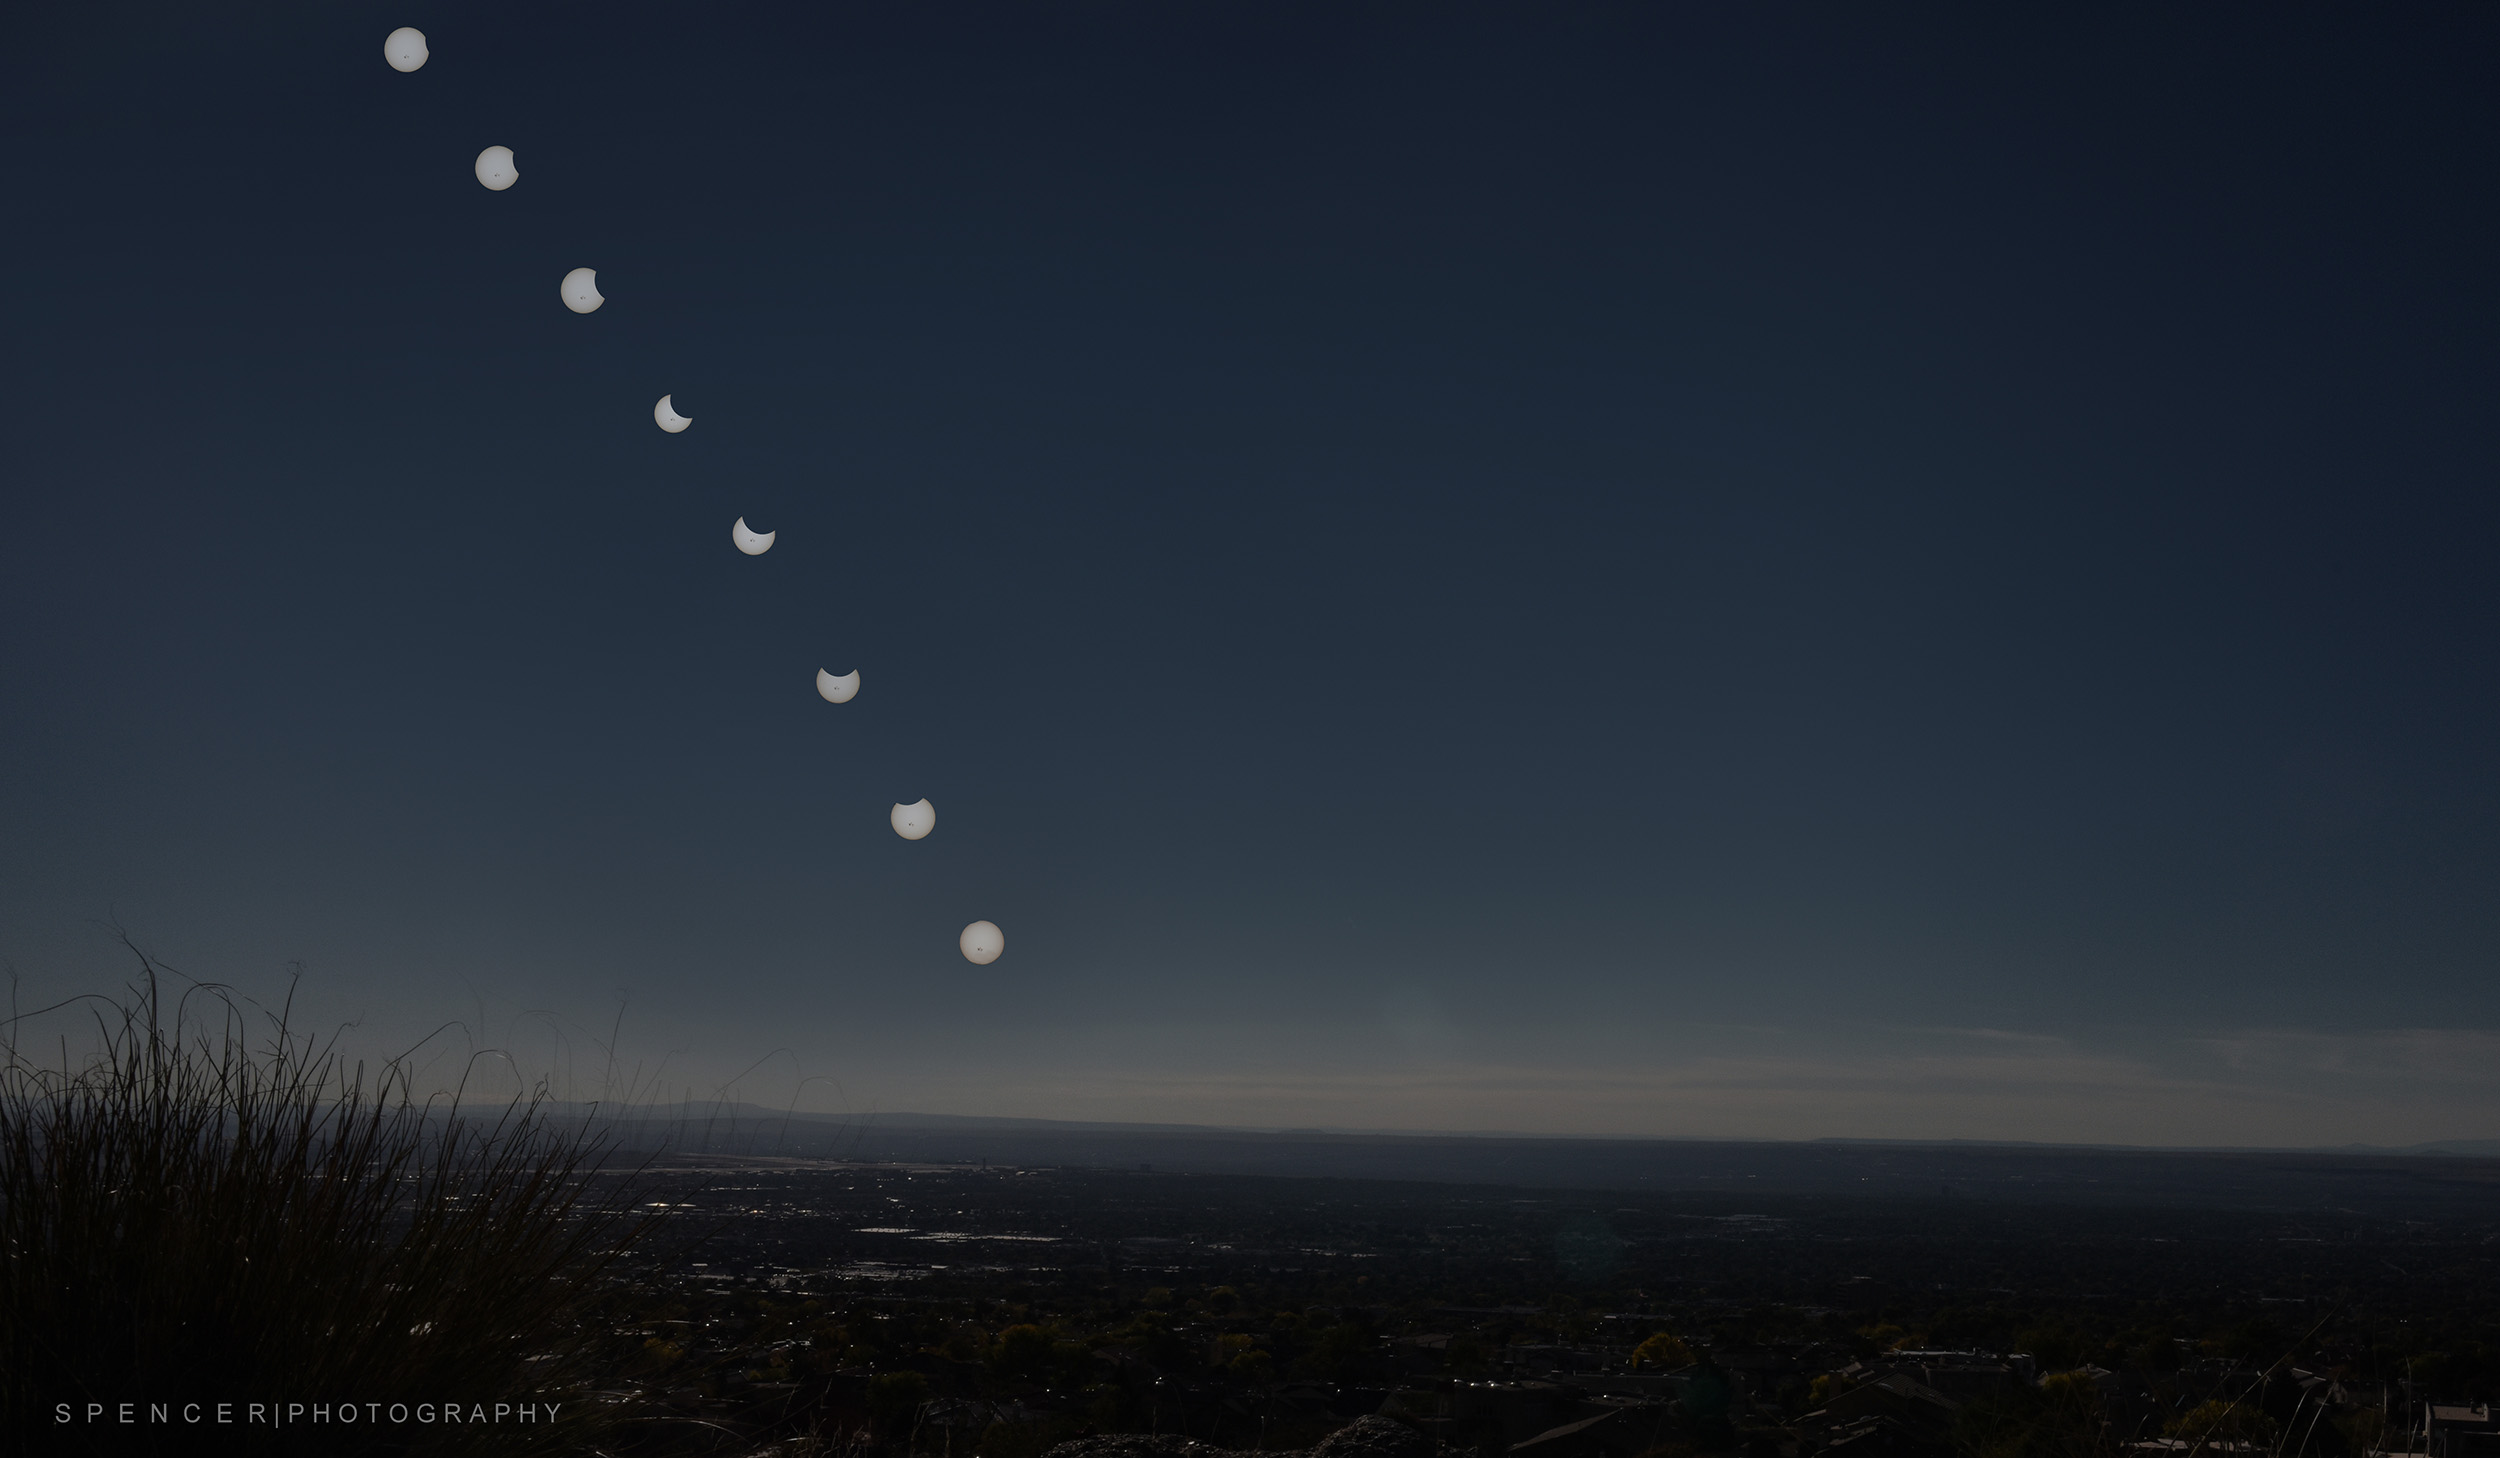
As for your location during the setup process, it’s entirely up to you. Do you want to grab 10 good shots of the eclipse progression and then stack them on an underexposed base image to give your final image a good composition and perspective? If so, then get out and grab a shot of a pleasant landscape that fits the eclipse location and elevation. If you do want to stack, remember this eclipse is happening mid-day. So stacking the eclipse low on the horizon of a base image won’t make much sense. If not, then just shoot anywhere you can get the full effect of the eclipse and then put together a cool collage of the progression.

Partial Eclipse Stack of the Moon Moving in Front of the Sun.

What Equipment Will I Need for My Camera?

WARNING: Do not photograph the sun without a solar filter on your lens. Using a long zoom lens and pointing your camera at the sun for extended periods can overheat the interior. This will result in an expensive repair or unrepairable equipment damage.

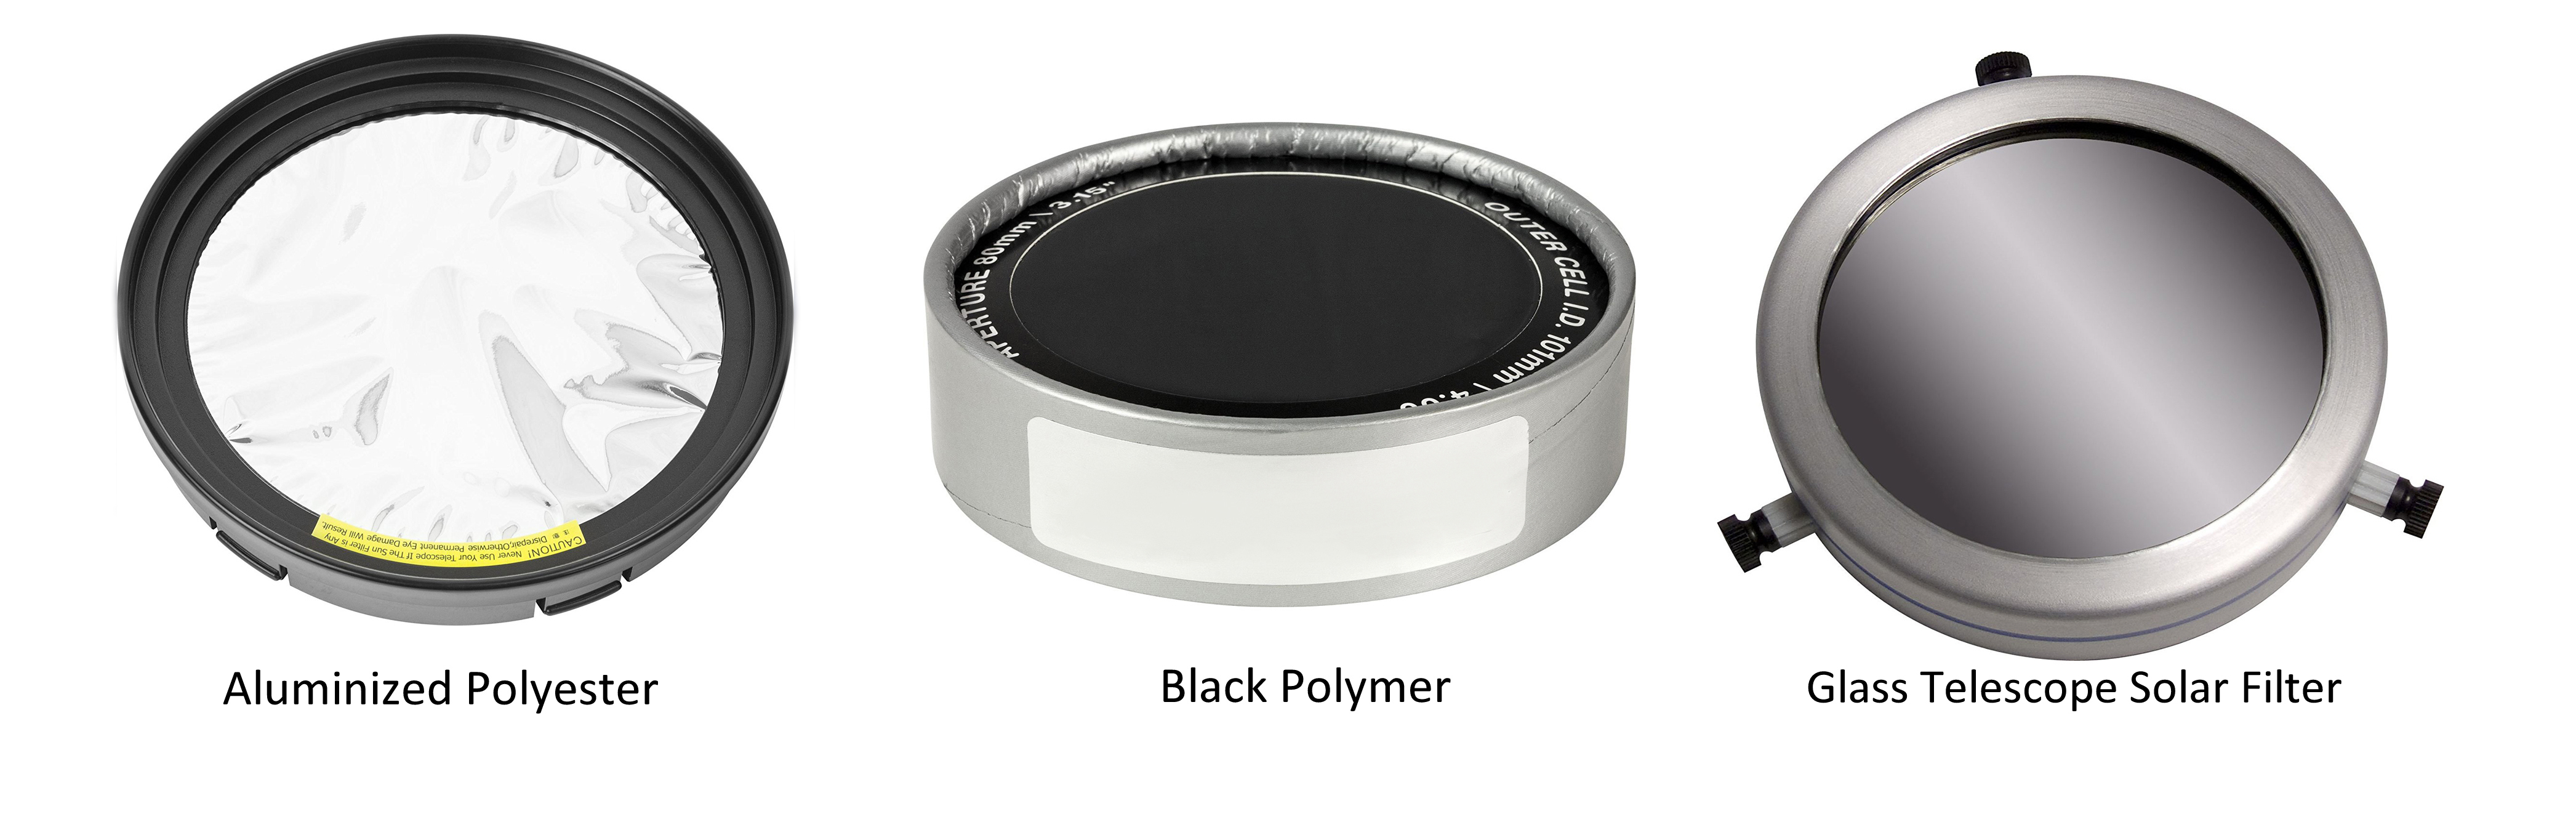
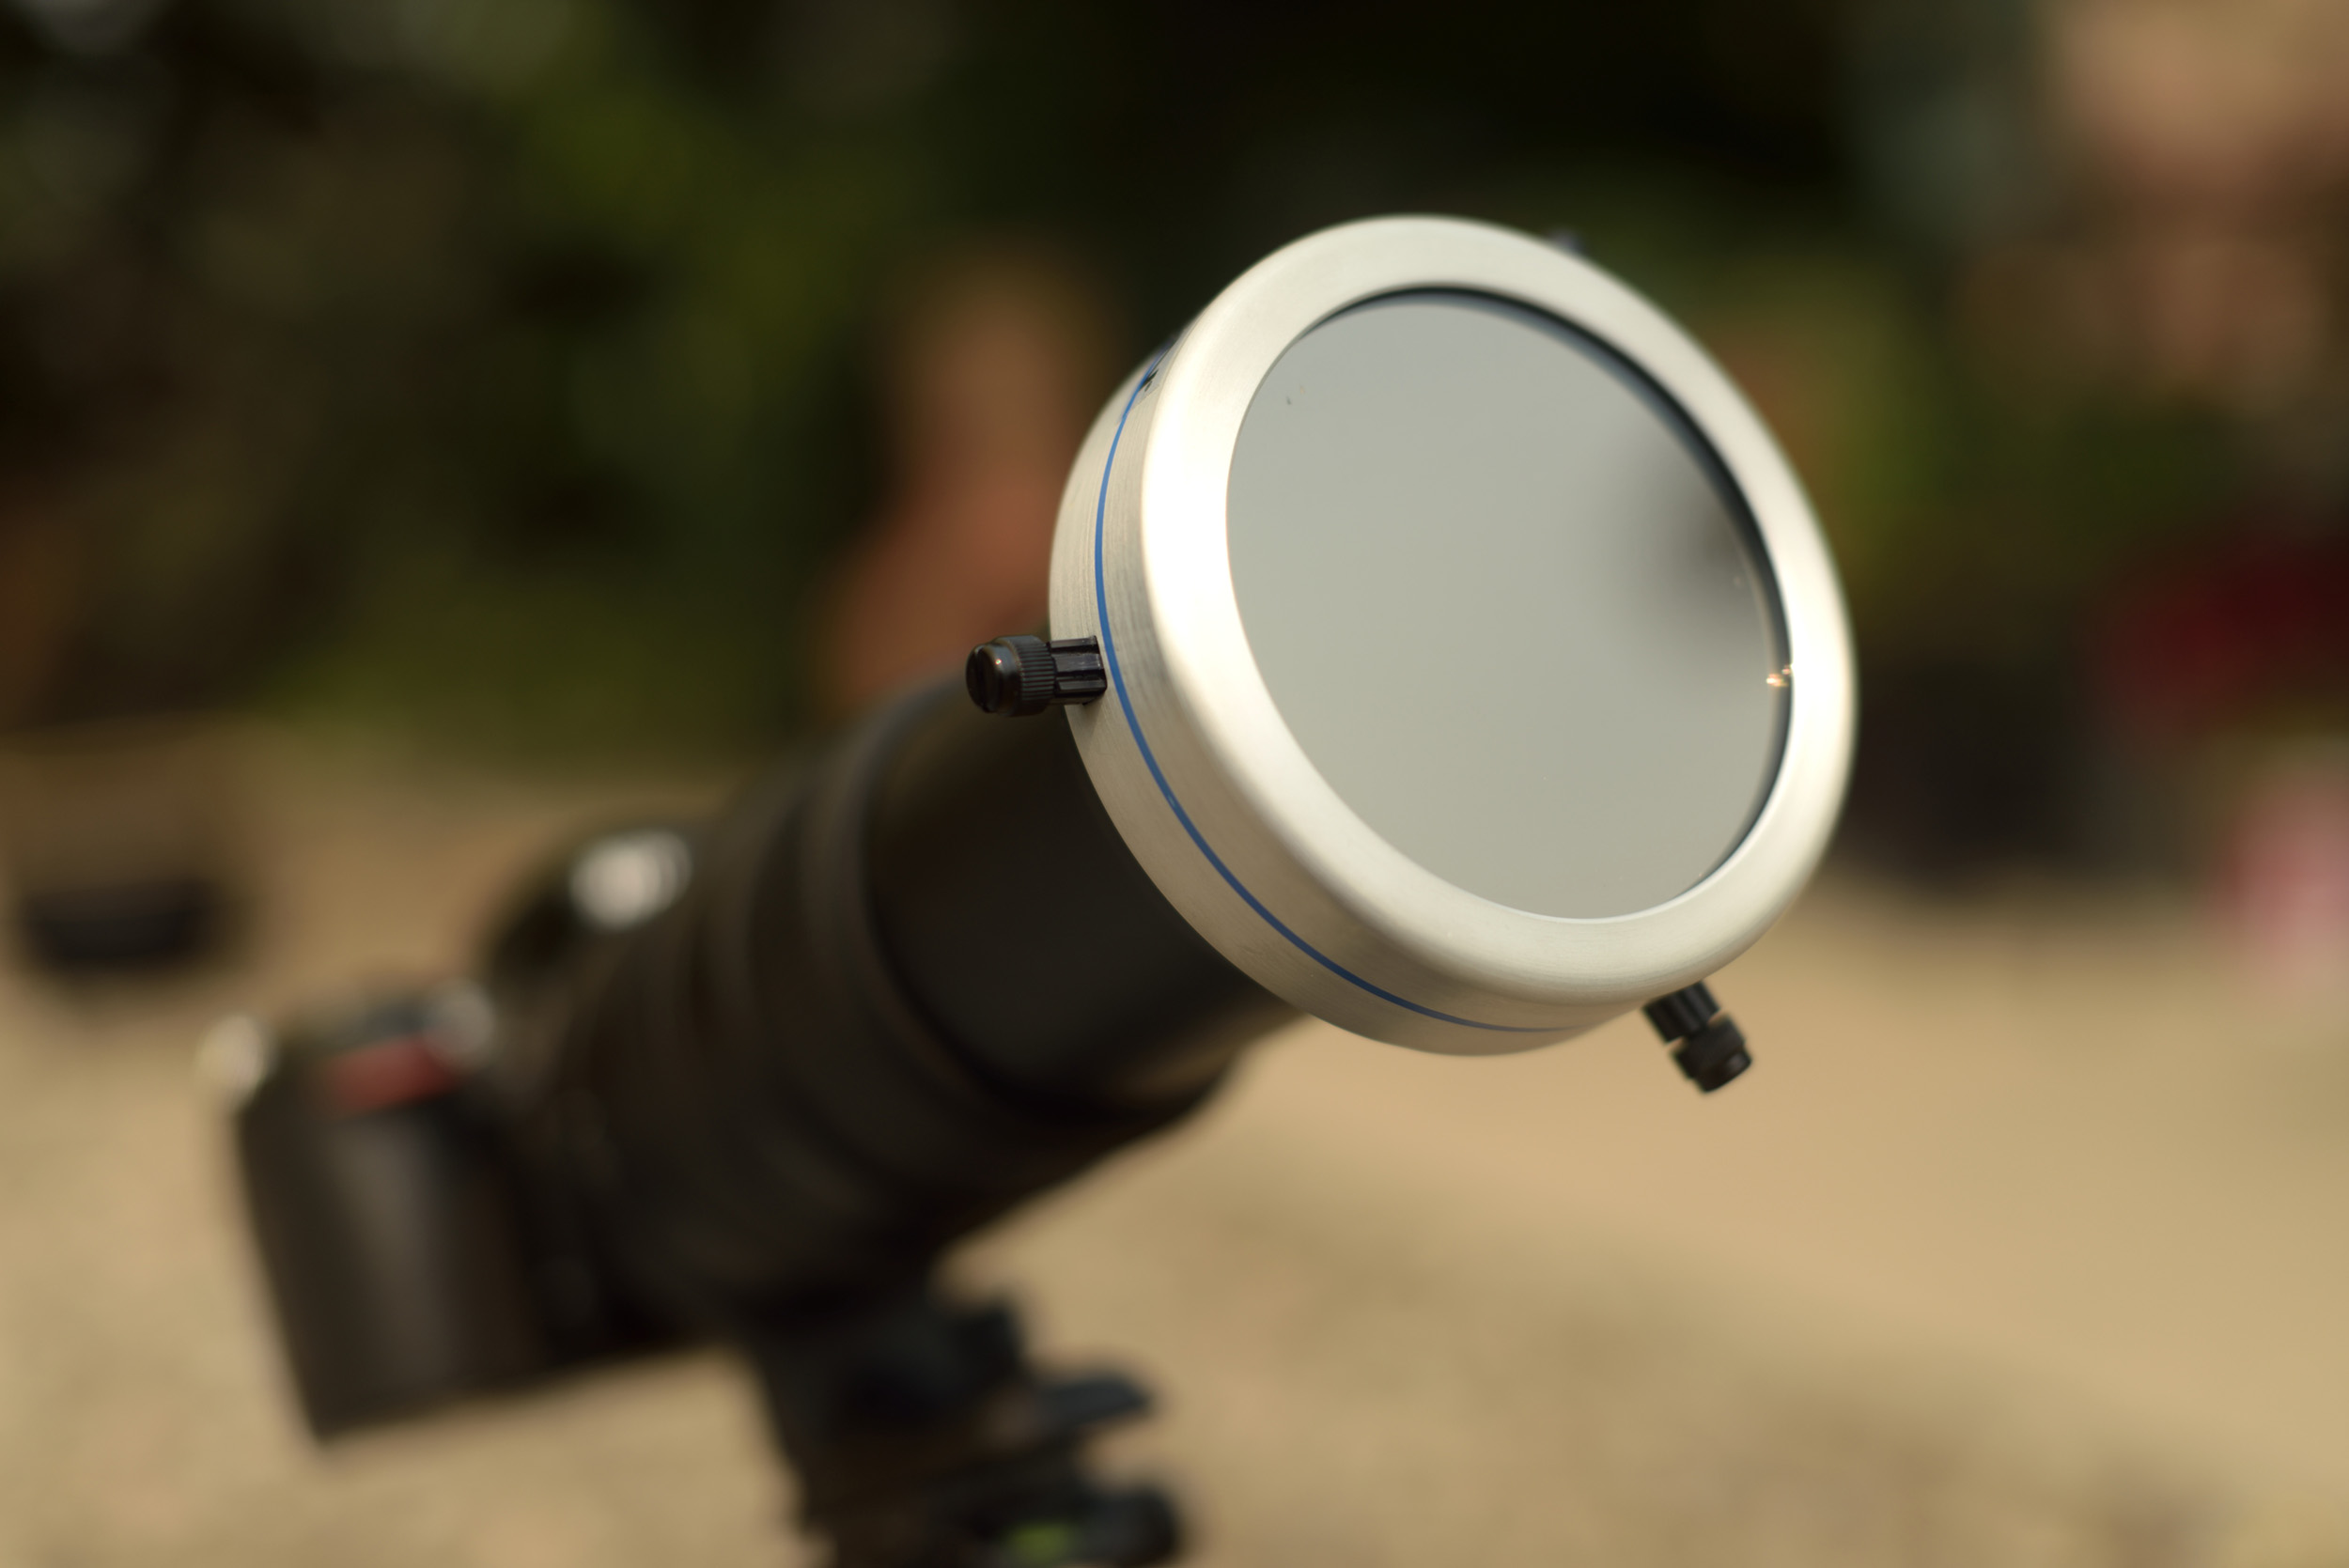
Solar Filters Solar filters affixed to the end of your lens block 99% of the suns light from entering into your telescope or camera. You cannot take a usable photo without a solar filter. The two most popular type of solar filters are aluminized polyester and black polymer (both plastic). Both are excellent choices for the eclipse photographer on a budget, come in multiple sizes to fit your lens, and are about 20 dollars. I prefer a telescope glass solar filter for its better optical performance. It’s about three times the cost but worth it, as we all remember what Roger says about putting a cheap filter in front of your expensive glass.

Some telescope filters are tricky to fit. I measured the diameter of my lens and then ordered a glass solar telescope filter with a diameter a bit larger to secure in place.

So what about neutral density (ND) filters and what’s the difference between those and a solar filter? Depending on what optical density (how dark the filter is) you choose, ND filters only block 10%, 20%, etc of the suns light. That is not nearly enough to protect your camera or capture a usable photo. Sure, you can stack about 5 to 8 ND filters to achieve the 99% block of incoming light, but now you’ve given up most of the optical quality of your lens resulting in blurry and unusable photos. This is where a solar filter comes in. A single solar filter blocks 99% of the suns light while maintaining sharpness and clarity.

Camera

I’ll be using a Nikon D810 and a Nikon D750. However, a full frame (FF) camera vs a crop sensor doesn’t matter too much. Of course, a full frame sensor is going to generally yield a better image quality, but we will be shooting at long focal lengths, and the added focal distance when using a crop sensor can be advantageous. The added dynamic range of a full frame sensor isn’t entirely important because this is, for the most part, a two color photo. Black background and the color of the sun. Also, ISO performance is not a factor here since all cameras, for the most part, perform really well at ISO 200.

Lens

Ok, this is the most important part. You need a good long piece of glass to photo the sun – at least 400mm plus. If I had my choice, I’d use a Nikon 800mm f/5.6E FL ED AF-S VR. But I don’t have that and it’s $15,000. So, I’ll be using a Sigma 50-500 f/5.6-f/6.3 and then cropping it a bit. In the past, I’ve used a Nikon 18-200mm with a 2x teleconverter that proved to be pretty good. If you’ve chosen to use a crop sensor, remember to multiply your focal range by your crop (usually 1.6) to get a representation of your true focal range. To wrap up, no matter what camera you are using, find a good long FF 400mm (or longer) lens. When photographing the sun, fast lenses (f/2.8, etc) won’t buy you much except faster shutter speeds.

Tripod

You can photograph this event without a tripod. But I wouldn’t recommend it.
Why? You will be shooting at 400mm or more. Even if you have an image stabilized lens there is still a chance for soft focus if you are shooting handheld. Also, during the shoot, the sun and moon will be moving. You will constantly need to adjust your cam to compensate for the movement, so a tripod will come in handy to make minor adjustments. Additionally, your arms and shoulders won’t get tired holding up all that equipment for the duration of the eclipse.

Camera Settings

Ok, so what settings should you start out with? All cameras will be different and your filter choice will affect this too. However, most will expose nicely at around f/7.1, 1/160th of a second shutter speed, and an ISO of about 100 – or close to that. It’s a good place to start and you can make adjustments from there. If you do need to make any changes, start with your shutter speed and then ISO adjustments. You really should use an aperture of f/6.3, f/7.1 or f/8 because a shallow depth of field is unnecessary here, and lenses generally yield sharper images at these f-stops. And remember you will be making constant changes to your settings as the moon moves in front of the sun. In fact, as the full eclipse happens you may have to lower your shutter speed and raise your ISO to compensate for the lower light coming from the full eclipse – so be ready. For those 2 minutes and 40 seconds, you should be standing in front of your camera and ready to make adjustments to your settings. Ultimately, you should end up with 200 plus photos during that time period. Its digital, take a photo every 2 to 5 seconds and adjust.

Remember to turn off Auto ISO and shoot in RAW to take advantage of the shadow and highlight adjustments in your favorite RAW editor.

Finally, autofocus once and then turn off the autofocus on your lens. Why? You may miss a shot if your camera can’t AF on the sun during the shoot. Get on site early, focus and then turn off AF.

Settings for Eclipse Totality

Now we get into the tricky and risky part. Experts at NASA and Space.com say it is safe to view the full totality of the eclipse without solar glasses. Equally, once totality is happening you will have to remove the solar filter and you might have to quickly adjust your camera settings for totality. Just in case, be ready to do this and know exactly how to quickly adjust your ISO and Shutter Speed. However, your camera settings should be about the same. Consider this; A solar filter blocks 99% of the suns light and the moon will be blocking 99 to 100% of the suns light during totality. So, you may even have to lower your shutter speed a bit and raise your ISO a bit during totality.

Quick Ref – Settings

  • Use a Tripod
  • AF off after you focus once
  • ISO 100 to 200
  • Shutter Speed 1/125 to 1/200th of a sec
  • Aperture f/6.3 to f/8
  • Auto white balance or if you have the option: 4000 to 5000 K

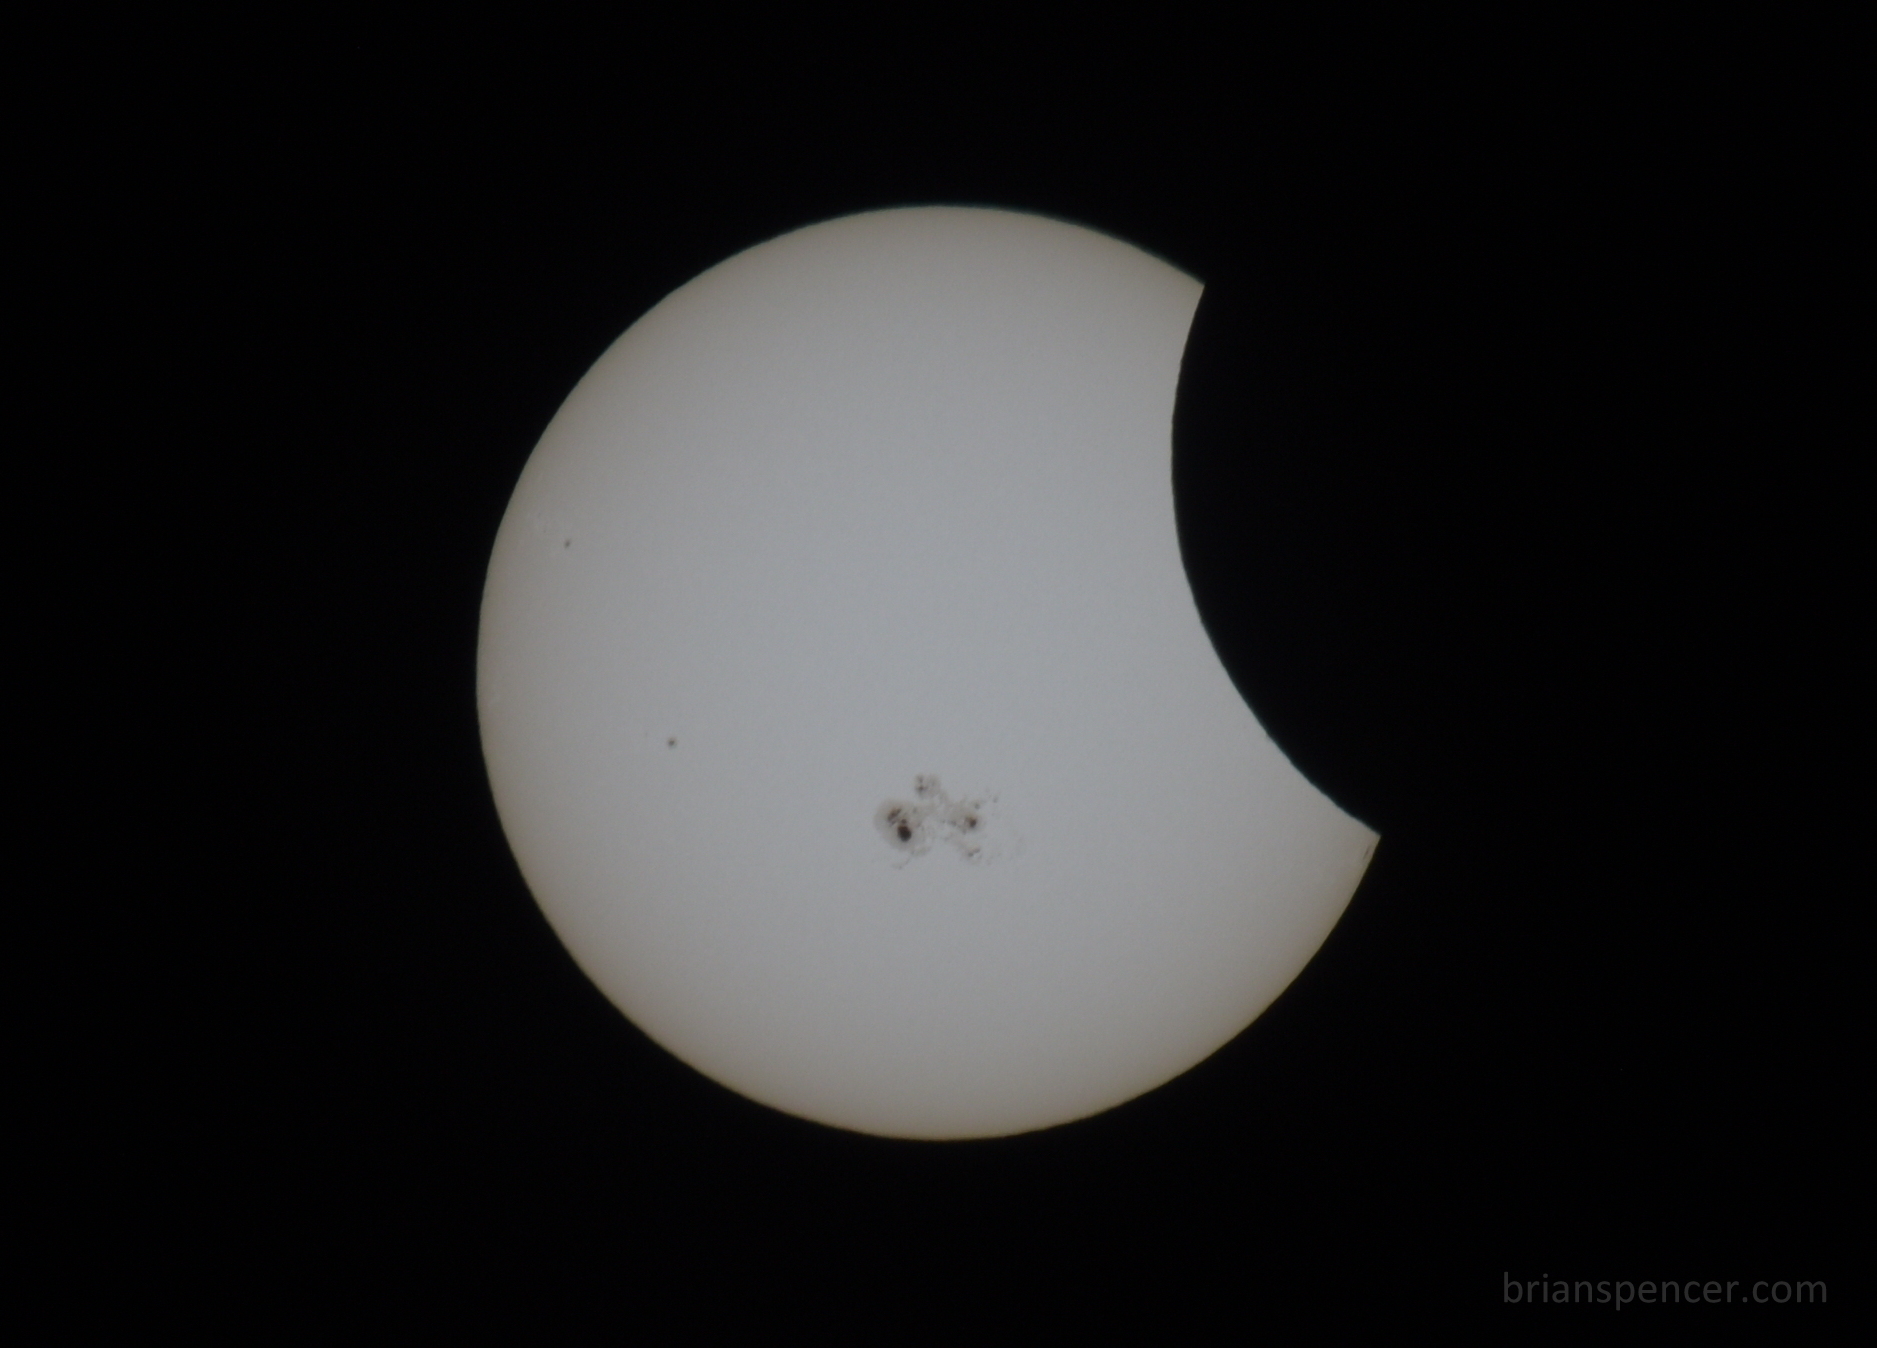
Partial eclipse in Oct of 2014. Settings: 1/125, f/6.3, ISO200 Glass telescope filter.

Final Thoughts

Practice. Practice. Practice. This is important. A few weeks prior, you should get out and practice photographing the sun then go home, edit and if need be, adjust your settings, etc. Experiment a bit and see what might be best for you and your equipment. What’s cool is, you can do this in your backyard every day until you feel confident enough that when Aug 21st arrives you will capture this event like a pro. And most important, take your friends and family and have fun.

The Badlands Pt. II

Some friends and I made another trip into the amazing Bisti or De-Na-Zin badlands in Northwest New Mexico. We backpacked in and spend the first night exploring the area. We had planned on taking more photos the second night but that was cancelled due to a good rain that stopped in making the entire place really wet and muddy. I’ll go back again soon. Aside from that, I put together my first time lapse and included it below. Its OK, but I’ll need to revisit my process in making the time lapse and joining the scenes, etc.

The area that includes the Bisti/De-Na-Zin Wilderness was once a riverine delta that lay just to the west of the shore of an ancient sea, the Western Interior Seaway, which covered much of New Mexico 70 million years ago. The motion of water through and around the ancient river built up layers of sediment. Swamps and the occasional pond bordering the stream left behind large buildups of organic material, in the form of what became beds of lignite. At some point, a volcano deposited a large amount of ash, and the river moved the ash from its original locations. As the water slowly receded, prehistoric animals survived on the lush foliage that grew along the many riverbanks. When the water disappeared it left behind a 1,400-foot (430 m) layer of jumbled sandstone, mudstone, shale, and coal that lay undisturbed for fifty million years. Sandstone layers were deposited above the ash and remains of the delta. The ancient sedimentary deposits were uplifted with the rest of the Colorado Plateau, starting about 25 million years ago. Six thousand years ago the last ice age receded, and the waters of the melting glaciers helped expose fossils and petrified wood, and eroded the rock into the hoodoos now visible. Source: http://en.wikipedia.org/wiki/Bisti/De-Na-Zin_Wilderness


Shooting the Milky Way

Hi
I receive lots of messages here and there about shooting the Milky Way (MW) and what my settings are and how I do it. Keep in mind that this is MY shooting style. Other photographers may shoot differently. So…. here ya go.

Location/Where to shoot/When to shoot?
First, get out of the city and away from lights! This is essential. You just cant see or photo the Milky Way near so much light noise. Second, It really depends on the time of year because the MW “rises” and is visible at different spots in the Eastern, Southern and Western sky. Heading out somewhere South and East of any noisy city light is best. You can shoot North (looking south) of any city light, you just have to be hundreds of miles away. Depending on the size, city light noise can be visible in your shot even at 150 to 200 miles (and maybe more) away. I live in the southwest and its pretty easy to get south of the city I live in to grab my shots. Also, shoot when there is little or no Moon. The Moon is so bright and depending on where its at in the sky it can wash out your view of the MW. For more info on finding a dark place to shoot, browse to: http://www.jshine.net/astronomy/dark_sky/ or http://www.darksky.org/night-sky-conservation/36-ida/night-sky-conservation/91-darksky-finder-a-destinations
Another helpful resource/program is Stellarium. This free program will allow you to see where the MW and the Moon is and when both will “rise” by time and location. http://www.stellarium.org/
The best time to shoot the Milky Way is in the summer months (If you’re in North America). Why? The Earth is in a position to see most of the MW. And when it “rises” and you can see it arch from South to North in the Eastern sky (early Summer). I always quote rise because the MW doesn’t really rise, it comes into view as the Earth makes it daily/monthly/yearly rotation around the sun. But you knew this – Right? 😉

Essential Equipment
A camera (DSLR) capable of high ISO capabilities
The best choice will be a full frame DSLR like a Canon 1D/5DMKIII/MKII/6D, a Nikon D4/D3s/D700/D600/D800/D4, etc, and other brands of full frame cameras. Full frame sensor cameras are the best choice for capturing the MW because of their stellar high ISO performance. But the MW would be easily captured as well with a crop sensor (APS-C size) like that of a Nikon D3100/3200/D5100/D5200/D7000/D7100/D90/D300(S), etc, or a Canon T2/T3/T4/T5/40D/50D/60D/7D, etc. As far as other cameras such as point n shoots or mirrorless are concerned, if they have the option to shoot in manual and set the exposure, aperture, and ISO, they should be able to grab something useable. But to be honest, I’m not sure as I don’t own one or used one.
A fast wide angle lens
Because the sky will be so dark, a fast (f/2.8 or faster) aperture lens would be preferable. The wider the view, the better because you will want to grab the biggest part of the sky possible – including the landscape to give the photo perspective. I use a Samyang 14mm f/2.8 lens. A wide zoom lens is fine too and with most of those the fastest aperture is f/3.5. You will also want to set your auto focus to OFF and then manually set the lens to the infinity focus setting. I use electrical tape to secure my focus ring so it doesn’t move if I accidentally touch it during the night.
A tripod
A good sturdy tripod is essential as you don’t want the camera moving during a long exposure. You will end up with nothing useful if you try shooting handheld.
A wired or wireless remote – Optional
When I’m out at night, I sometimes shoot startrails and/or timelapses. Some photographers prefer to use a wired intervalometer/remote. This device allows you program and setup an automated continuous cycle of 30 second exposures. This is really handy if you don’t want to stand by your camera for hours hitting the shutter button over and over every 30 seconds. Some of the newer Nikons and Canons (and others) have built in intervalometers. Most DSLR’s have the option to use a IR (wireless) Remote and you might be able to pick one up at a local camera retailer for $20 dollars. However, if you don’t have any of the above, its really not that much work to setup a chair by your camera and just hit the shutter button every 30 seconds. 😉 To lighten my load when I’m out shooting the Milky Way, I dont carry a remote of any type. I just hit the shutter. If the tripod is sturdy, its fine.
Example wired timer for Nikon: Amazon
Battery/Memory Card
Get a large memory card. Don’t forget to charge your batteries and maybe bring an extra because you might be shooting for hours. You can always pick up extras for most cameras at a local camera retailer.


How to shoot and settings
These are my settings and what I use. I cant speak to how your particular brand of camera settings are completed with regard to the below.
1. Get your cam on the tripod and lock it to your view (Eastern, Southern sky, etc).
2. Set your camera to manual (M) mode.
3. Set a 30 second exposure time (Shutter Speed). Why 30 seconds? If you shoot any longer you will start to end up with star trails. You will need to experiment here a bit. Occasionally I’ll shoot at slower speeds such as 15 seconds depending on the night sky, surrounding light, etc.
4. Set your lens to its fastest aperture – Mine is f/2.8. If you are using a lens with aperture of something slower than f/2.8 (I.E. f/3.5, F/4) you might have to shoot a bit longer. If this is the case most cameras have a Bulb mode. The shutter will stay open as long as you have your finger on the shutter button or you can use a wired remote. See “A wired or wireless remote” above.
5. If using a zoom lens, set it to its widest point. 18mm, etc. For APS-C size or crop sensor cameras my favorite lens is the Tokina 11-16 f/2.8.
6. Turn off auto focus and set the lens/camera to manual focus and then focus to the infinity mark.
7. Set your ISO to what you want to shoot at. On my Nikon D600, I usually shoot at ISO5000 (Yes 5000).
8. I TURN OFF long exposure noise reduction (NR) in my camera. Why? If you have this turned on, after a 30 second exposure, the camera will take an additional 30 seconds to apply the NR after EACH shot. If I’m out shooting the stars/MW I leave this off so I can quickly switch from shooting the MW to shooting startrails. If I leave NR on, I’ll end up with gaps in my startrail stack when I post process. You can apply NR in post process.
9. If you have the ability (photoshop or similar), shoot in and edit in RAW and not JPG. There is so much image quality you can pull out of a RAW file then a JPG when editing.

About ISO
Every camera is different and you will need to experiment. Because the sky will is so dark, my suggestions for full frame cameras are ISO5000 at 30 seconds and with an aperture of F/2.8. For crop sensors (APS-C size) a setting of ISO3200 or ISO4000 should yield some useful photos. Again, I suggest you experiment, take a few photos and look at the result on your cameras LCD screen. Too Dark? Increase the ISO. Too light or over exposed? Lower the ISO. In addition to the ISO setting, consider shooting longer or slower. I usually start off with a 30 second and adjust ISO and shutter speed to get what I want. If your fastest aperture is F/3.5 or F/4, etc., you will have to compensate with a higher ISO setting or maybe a longer shutter speed (See Bulb above). See your cameras manual for more info.

About Noise Reduction
Shooting at high ISO always results in noisy photos. Earlier I mentioned I shoot with no noise reduction because I like to reduce noise in post process using photoshop or photoshop plugins. If you dont have that ability to edit RAW files, are shooting in JPG and are just shooting the MW, turn the in camera noise reduction on.
Again. This is how I shoot. Other photographers have their way of shooting too. But this is the nice thing about photography, its an art form and you (and I) can shoot any way we wish.
Finally, if you don’t have a camera or don’t want to go through all of the above, just grab some chairs, your loved ones, and go sit and stare at the sky in a quiet remote place. There is so much to enjoy just looking straight up, deep thinking and enjoying the serenity. 🙂