About Spencer Photo

Photographer

Photography Underwater

This article is not about my advice on how to run your photography business with regard to legalities, releases (prop, model, and liability), safety, price, and style, etc. However, it is about what I do, how I prep, and how I take photos underwater (UW). That’s it. Read it and if you get some good ideas and want to try, then go explore and do it safely and legally.

About me
I’ve always been interested in photography and was hooked with my first camera long ago – a Minolta X700. If there is a photo opportunity, I’m all in and I’ll submerge myself into learning more about that particular type of photography. My passion for photography takes me everywhere from shooting macros of insects, to landscapes, time lapses, portraits, weddings, and more. And in this case, shooting models underwater.

Model on IG: @kirin.lee

Ok, so let’s get into what I do to shoot underwater

Safety – Safety – Safety:
Shooting UW with a model can be dangerous. I always chat with the model before we shoot and again the day of and before we get in the water to explain the risks of shooting UW. After the chat, we get in shallow water, take a look around, become familiar with our surroundings, and practice what we will do. If at any time I notice the model struggling, we will stop and re-evaluate our session. At that point, we will either stay in shallow water and do portraits or stop the shoot all together. It’s also very important to take frequent breaks between shots. She or he needs to be well relaxed, focused, and comfortable. Constant communication during the shoot is essential and will give you an idea of how they are feeling.

Models L to R on IG: @lexii_shepherd @kirin.lee @burgers_works

To further minimize the risks, I have multiple safety people who are well known to me as excellent swimmers, know CPR, and keep constant focus on the model and myself during the shoot. They are always there to render assistance if any problem should occur.
Another thing to keep in mind is water temperature. I find that the experience is so much better in 75 to 80 degree water. Anything colder becomes a nuisance and can make the shoot miserable and maybe unsafe. Finally, talk to the model about clothes. Obviously you don’t want an inexperienced swimmer jumping into the deep end of a pool wearing a ball gown. Focus on clothing that is easy to swim in, is light, and flows well. Its also a good idea to have water and snacks on hand to refresh energy.
Ultimately, this should be a safe, fun, and relaxing time for both you and the model.
With all of that said, I normally shoot with models that have I have a history with. I know they can swim, drop, and pose really well. I evaluate, develop and maintain relationships with those that have excellent skills UW.

Models L to R on IG: @raven_lass @audre.photographe @shipps_shapes

Equipment:
Camera/UW Case
I’ve been shooting UW for about 5 years and started with a Olympus TGx series, then moved on to a Canon G16 in a Fantasea UW case. As my passion and editing improved, I upgraded to an Ikelite UW case for my Nikon D750 and then eventually added two Ikelite DS160 strobes with 15 foot cords so I could shoot with off camera light. I also carry two 7 foot light stands for use either in the water or laying down on the edge of the pool. I’ll affix the lights to the stands and dip them about 6 inches in the water or set them up in the pool along side the model and myself. Depending on my light setup, I use lead weights or pre-washed rocks or bricks to hold down my stands both in and/or on the edge of the pool.
case
Pelican Case Air with Ikelite UW housing and port/dome.

To protect all my equipment from damage when not in use or when traveling, I store the UW case and lens port/dome in a Pelican Case Air, the strobes, cords, and the rest of the equipment in a padded bag. In addition, the bag also has room for a few tools, silicone, extra gaskets for the UW case, sunscreen, swim gear, and my dive mask.

Models L to R on IG: @comettgirl @jamison.models @lucky9one

Lens Choice
Other than well maintained salt water pools, most chlorine pools, the ocean, and lakes can sometimes become cloudy with the over use of chlorine treatments, sand, or dirt, etc. Also, I like my working distance with the model to be about 5 to 7 feet for easy communication and safety. Zooming UW for this kind of work makes no sense. So, because of all that I chose a Nikon 24mm f/2.8D lens to pair with my Nikon D750. The Nikon 24mm focus is extremely fast, has a close focusing distance of about 1 foot, and is very sharp. Because of the close working distance, the chances of in focus shots are much higher. Shooting UW and especially in cloudy or murky conditions will degrade the cameras ability to focus accurately. Therefore you will want to work as close as possible to the subject.
On a side note, avoid dragging lots of props in a pool. Color bleeding of fabric, dirt on props, etc can cloud up the water.

Models L to R on IG: @raven_lass @shipps_shapes @burgers_works

Personal Gear
Obviously in a pool I wear regular swim gear but most importantly, a weight belt of  6 pounds and a dive mask. The 6 pounds of weight help me to drop to the bottom of the pool faster and easier. I never ask the models to wear weight. The mask is important so that I can see what the model is doing and I can compose shots easier. In a lake or ocean, I’ll don SCUBA gear and tether my camera to my SCUBA gear. Truth be told, I’ve only photo’d fish in the ocean and a few models in a lake. But that will change soon.

Shooting:
Camera settings
Depends on ambient light, but for the most part time I use Aperture Priority, ISO 100 to 200 (ish), and F/4 (opens of the DOF just a bit – shooting UW is not about bokeh). Sometimes with good constant ambient light I’ll switch to manual and adjust settings as needed. Obviously with off camera lights I’m limited to 1/200 of a second with my D750 so I’ll switch to manual and adjust my camera settings and strobes as ambient light changes. Most everything I do in and out of the water is at a color temp of 5600K. And sure, the water creates a ton of color cast but that’s easy to fix in Lightroom. I’ll go more into that later. Shooting UW is tough but the Nikon D750 and the 24mm focus so fast I use group 4 point AF-S and usually keep the group in the middle of the frame. At f/4 99% of my shots are in focus. I don’t use 3D, AF-C, back button focus, etc. Every once in a while if I’m shooting portraits UW, I might switch to a 50mm f/1.4 and shoot at f/1.4.

Natural light shot – mid day sun. Model on IG: @nagy.design

Natural Light VS Off Camera Lighting (OCF)
I like how both OCF and natural light look in different conditions UW. For example, if shooting during a bright sunny day, I’ll shoot natural light because I like the way the light falls through the ripples on the surface and land on the model. But as the day goes on and the sun gets low, I like to add OCF, both behind and in front of the model as it almost creates a 3D effect. So on most shoots, I’ll do both.

Models L to R on IG: @burgers_works @kirin.lee @laurennosimoore
In the 3 photos above are different examples of OCF (left to right): 1 – strobes in the water: behind right and in front left. 2 – Direct on camera flash. 3 – two out of water strobes on light stands with Alien Bee 7″ reflectors and 30 degree grid inserts.

My shooting style underwater

Tips while shooting.
I discuss with the model whether we are doing a portrait, sitting full body, or a full body swim/movement shot. I’ll drop down on a 2 count and ask her/him to drop down on a 3 or 4 count. This way I’m in place and ready to shoot when they are in motion or dropping to pose. I’ll usually stay down for 10 to 15 seconds and I coordinate this time with the model.
I’ve found its a lot easier to drop and shoot in a horizontal position than it is kneeling or in a sitting position. In addition, I like to get as low as possible and shoot up. The comp and perspective is more pleasing this way. I’ll do the same SCUBA diving. The bubbles from my regulator get the way if I’m vertical.
Take your time. Pool shoots are strenuous and require lots of breaks between shots. Even with one model I plan 2 hours. This includes setup, discussion, breaks, and shooting.

OCF setup with two 15 foot corded Ikelite DS-160 Strobes.

Editing:
Editing UW shots is a bit tough because of all the color cast. And depending on how deep you are the water it will absorb different wavelengths of light. Even at 5 to 10 feet, red is the first to disappear and then followed by yellow and orange. This is why skin tones are most affected. You can solve this problem by changing your cameras white balance settings or just shoot in RAW and fix it in RAW editor. To resolve this, I turn to Lightroom. I’m sure the editing experts out there have a million other ideas – but for the most part this will bring the skin tones, etc back to where they should be.

Before and after Lightroom/Photoshop edit. Model on IG: @laurennosimoore

My quick edit process:

1. I import my RAW files into Lightroom.
2. Move the temp slider somewhere between 6000 and 7500.
3. Move the tint slider to somewhere between +10 to +35
4. Desaturate, lower shadows (darken), bring up highlights.
5. Adjust contrast to +30 or higher.
6. When I’m done in Lightroom, I’ll export jpeg and continue edits in Photoshop. Here I will remove bubbles, background distractions, maybe adjust hue, crop, etc.
Remember this is my process for RAW photos produced by the Nikon D750. Your camera will produce something different and you will have to find your own workflow.

Thanks for reading and I hope you enjoyed it. Remember to have fun and always keep safety in mind.
You can see most of my work here:
http://www.brianspencer.com 
https://www.instagram.com/bspencerphoto
https://www.instagram.com/bspencer505

Retoucher on IG: @lnshipphoto – Model on IG: @shipps_shapes
Other credits: Cover photo @josouuu
MUA on Kirin Lee: On IG: @stormfx13

Google Pixel 2

I did a quick photo shoot with the Google Pixel 2 – the best camera phone on the market.

NOTE – This article will be updated in the next few days with more photos, etc

I’m not going to get into a “review” of the Pixel 2 – this was just a fun project to see what I could grab with a camera phone and whether or not I could actually get some usable portraiture. I think I did! Coming from a D810 and that 36 megapixel resolution I miss the ability to crop close and then edit fine details. Obviously, I’m not getting that with any camera phone. But I’m really impressed with the color and the depth of field the built in for taking ports with this phone. So cool and it really could be used for a port shoot on the fly if thats all you have with you. The Google Pixel 2 camera is super fast at AF and once focused, snaps super fast pics. I didn’t have to do much editing on these except a bit of contrast, desat and a few detail adjustments in photoshop. I’ve also noticed that the Pixel 2 does much better with diffused light. The photos turned out much better with overcast skies then with filtered sunlight. 😀

Models (On IG): @emilyeatsyourflowers – @katiechavez_art

How to Photo the Aug 21st Total Solar Eclipse

Note: I originally wrote this for the Lens Rentals Blog and can be found here: https://www.lensrentals.com/blog/2017/07/guide-to-photographing-the-solar-eclipse-on-august-21st-2017/

On August 21st, 2017, a solar eclipse will be happening throughout the United States, which has created a lot of excitement and questions from our readers and customers. As a result, I wanted to put together a small guide on how to properly and safely photograph this incredibly rare event. Let’s get out and photograph the first full solar eclipse in the United States since 1991! But before you run out and point your expensive DSLR directly at that big ball of fire we orbit, maybe we should talk about safety, what’s happening, and gather some equipment first. Cool?

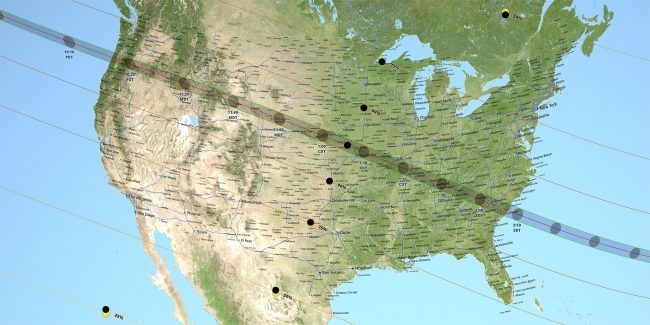
Ok, so what’s happening? On Aug 21st, 2017 the sun will disappear behind the moon totally eclipsing the sun. This will effectively cast some degree of twilight across the United States and especially in the path of totality. The path is about 70 miles wide and extends in a straight line from South Carolina to Oregon. The last time the United States saw a coast to coast total eclipse was in 1918. The eclipse duration is about 2.5 plus hours long with totality lasting up to 2 minutes and 40 seconds in some locations. What’s really exciting about this is you will be able to view the suns corona with the naked eye during totality. This time around the United States is the only country that will be able to view this eclipse in its entirety.

The eclipse starts and ends at different times depending on your location. Wanna know more? Space.com has an excellent guide including eclipse start/end location time charts.

Safety

WARNING: Permanent eye damage will occur if viewing the sun either directly, through binoculars, through a telescope, or through the view finder of your camera. Never view the sun directly without solar viewing glasses.

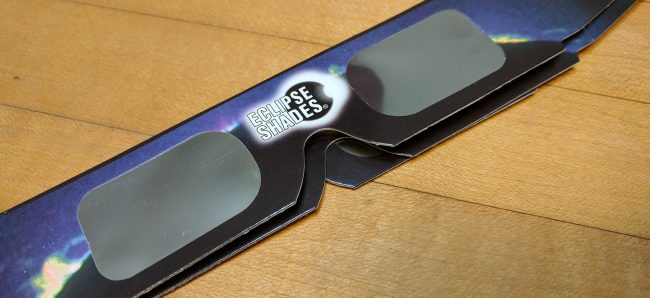
The first and MOST important item in your bag should be eclipse viewing glasses. It’s paramount that you protect your eyes at all times when looking at the sun. They are cheap and you can get a ten pack for about 15 bucks on Amazon. I’ve used these for years and have never had a problem. Finally, don’t forget other items to make your adventure more enjoyable like a small chair, umbrella, sunscreen, water, snacks and a hat.

Location of Eclipse

Your success of eclipse will depend on your location within the United States. While the eclipse will be seen throughout the entire United States, the best viewing spot of the eclipse occurs through Salem, Oregon down through Charleston, South Carolina. Use the map below as a reference guide, and if you’re able to increase your magnitude, take the extra effort to make it happen.

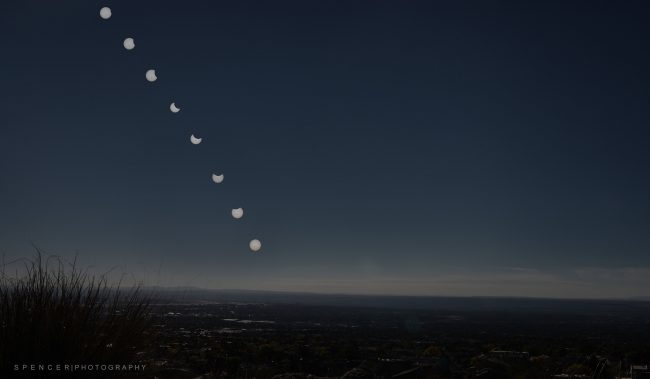
As for your location during the setup process, it’s entirely up to you. Do you want to grab 10 good shots of the eclipse progression and then stack them on an underexposed base image to give your final image a good composition and perspective? If so, then get out and grab a shot of a pleasant landscape that fits the eclipse location and elevation. If you do want to stack, remember this eclipse is happening mid-day. So stacking the eclipse low on the horizon of a base image won’t make much sense. If not, then just shoot anywhere you can get the full effect of the eclipse and then put together a cool collage of the progression.

Partial Eclipse Stack of the Moon Moving in Front of the Sun.

What Equipment Will I Need for My Camera?

WARNING: Do not photograph the sun without a solar filter on your lens. Using a long zoom lens and pointing your camera at the sun for extended periods can overheat the interior. This will result in an expensive repair or unrepairable equipment damage.

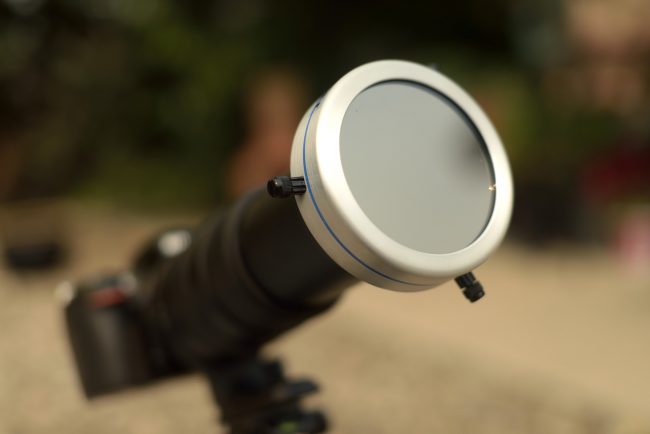
Solar Filters Solar filters affixed to the end of your lens block 99% of the suns light from entering into your telescope or camera. You cannot take a usable photo without a solar filter. The two most popular type of solar filters are aluminized polyester and black polymer (both plastic). Both are excellent choices for the eclipse photographer on a budget, come in multiple sizes to fit your lens, and are about 20 dollars. I prefer a telescope glass solar filter for its better optical performance. It’s about three times the cost but worth it, as we all remember what Roger says about putting a cheap filter in front of your expensive glass.

Some telescope filters are tricky to fit. I measured the diameter of my lens and then ordered a glass solar telescope filter with a diameter a bit larger to secure in place.

So what about neutral density (ND) filters and what’s the difference between those and a solar filter? Depending on what optical density (how dark the filter is) you choose, ND filters only block 10%, 20%, etc of the suns light. That is not nearly enough to protect your camera or capture a usable photo. Sure, you can stack about 5 to 8 ND filters to achieve the 99% block of incoming light, but now you’ve given up most of the optical quality of your lens resulting in blurry and unusable photos. This is where a solar filter comes in. A single solar filter blocks 99% of the suns light while maintaining sharpness and clarity.

Camera

I’ll be using a Nikon D810 and a Nikon D750. However, a full frame (FF) camera vs a crop sensor doesn’t matter too much. Of course, a full frame sensor is going to generally yield a better image quality, but we will be shooting at long focal lengths, and the added focal distance when using a crop sensor can be advantageous. The added dynamic range of a full frame sensor isn’t entirely important because this is, for the most part, a two color photo. Black background and the color of the sun. Also, ISO performance is not a factor here since all cameras, for the most part, perform really well at ISO 200.

Lens

Ok, this is the most important part. You need a good long piece of glass to photo the sun – at least 400mm plus. If I had my choice, I’d use a Nikon 800mm f/5.6E FL ED AF-S VR. But I don’t have that and it’s $15,000. So, I’ll be using a Sigma 50-500 f/5.6-f/6.3 and then cropping it a bit. In the past, I’ve used a Nikon 18-200mm with a 2x teleconverter that proved to be pretty good. If you’ve chosen to use a crop sensor, remember to multiply your focal range by your crop (usually 1.6) to get a representation of your true focal range. To wrap up, no matter what camera you are using, find a good long FF 400mm (or longer) lens. When photographing the sun, fast lenses (f/2.8, etc) won’t buy you much except faster shutter speeds.

Tripod

You can photograph this event without a tripod. But I wouldn’t recommend it.
Why? You will be shooting at 400mm or more. Even if you have an image stabilized lens there is still a chance for soft focus if you are shooting handheld. Also, during the shoot, the sun and moon will be moving. You will constantly need to adjust your cam to compensate for the movement, so a tripod will come in handy to make minor adjustments. Additionally, your arms and shoulders won’t get tired holding up all that equipment for the duration of the eclipse.

Camera Settings

Ok, so what settings should you start out with? All cameras will be different and your filter choice will affect this too. However, most will expose nicely at around f/7.1, 1/160th of a second shutter speed, and an ISO of about 100 – or close to that. It’s a good place to start and you can make adjustments from there. If you do need to make any changes, start with your shutter speed and then ISO adjustments. You really should use an aperture of f/6.3, f/7.1 or f/8 because a shallow depth of field is unnecessary here, and lenses generally yield sharper images at these f-stops. And remember you will be making constant changes to your settings as the moon moves in front of the sun. In fact, as the full eclipse happens you may have to lower your shutter speed and raise your ISO to compensate for the lower light coming from the full eclipse – so be ready. For those 2 minutes and 40 seconds, you should be standing in front of your camera and ready to make adjustments to your settings. Ultimately, you should end up with 200 plus photos during that time period. Its digital, take a photo every 2 to 5 seconds and adjust.

Remember to turn off Auto ISO and shoot in RAW to take advantage of the shadow and highlight adjustments in your favorite RAW editor.

Finally, autofocus once and then turn off the autofocus on your lens. Why? You may miss a shot if your camera can’t AF on the sun during the shoot. Get on site early, focus and then turn off AF.

Settings for Eclipse Totality

Now we get into the tricky and risky part. Experts at NASA and Space.com say it is safe to view the full totality of the eclipse without solar glasses. Equally, once totality is happening you will have to remove the solar filter and you might have to quickly adjust your camera settings for totality. Just in case, be ready to do this and know exactly how to quickly adjust your ISO and Shutter Speed. However, your camera settings should be about the same. Consider this; A solar filter blocks 99% of the suns light and the moon will be blocking 99 to 100% of the suns light during totality. So, you may even have to lower your shutter speed a bit and raise your ISO a bit during totality.

Quick Ref – Settings

  • Use a Tripod
  • AF off after you focus once
  • ISO 100 to 200
  • Shutter Speed 1/125 to 1/200th of a sec
  • Aperture f/6.3 to f/8
  • Auto white balance or if you have the option: 4000 to 5000 K

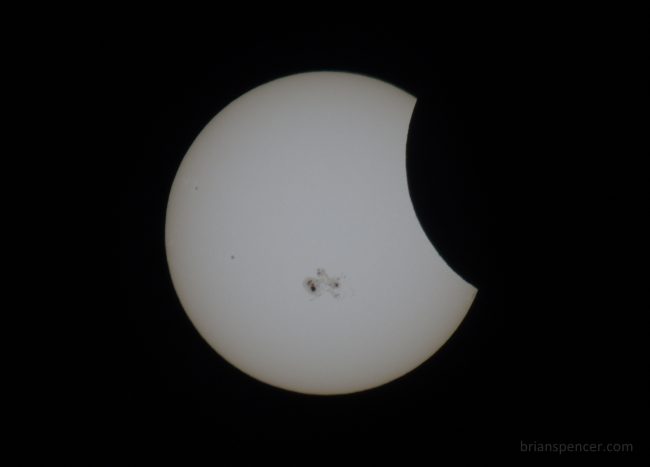
Partial eclipse in Oct of 2014. Settings: 1/125, f/6.3, ISO200 Glass telescope filter.

Final Thoughts

Practice. Practice. Practice. This is important. A few weeks prior, you should get out and practice photographing the sun then go home, edit and if need be, adjust your settings, etc. Experiment a bit and see what might be best for you and your equipment. What’s cool is, you can do this in your backyard every day until you feel confident enough that when Aug 21st arrives you will capture this event like a pro. And most important, take your friends and family and have fun.

Handmade in New Mexico

Photography in the desert…..

I recently had the pleasure of working with a few of New Mexico’s best local artists. I met up with Model Chow and makeup artist, Jacqueline Chavez. We hung out, talked, and finalized our plans for the shoot while Jacqueline did her magic on Chow. Previously, Chow had met with jeweler Lauren Tobey of Meltdown Studio to grab a few pieces of her beautifully hand crafted jewelry for us to use in a desert photo shoot. When Jacqueline completed Chows’s makeup, we loaded up and took an hour and a half drive west of Albuquerque, NM to take in the desert skies, the views and maybe a bit of adventure.

Lauren Tobey Jewelry
Meltdown Studio
Makeup by Jacqueline
Model Chow

See more of my work as a photographer here and here

Perseids Meteor Shower!

The Perseids Meteor shower is here and will peak on the early morning of Aug 13th, 2015. What is it? Every year from around the third week of July until the third week of August the Earth crosses the orbital path of the Comet Swift-Tuttle. As debris from the comet hits the Earths atmosphere we see meteors. Pretty cool huh?

Anyway, lets get into shooting the meteors and what I do to capture them.

Location/Where to shoot?
Get out of the city and away from lights! Head out somewhere East and a bit North of any noisy city light. The city light will obscure some or most of the meteors and you don’t want any light noise in your shots as you will be shooting to the North, South, and East. For more info on finding a dark place to shoot, browse to: http://www.jshine.net/astronomy/dark_sky/
The meteors originate from the radiant of the Constellation Perseus and travel through the entire night sky. I use two cameras with ultra wide 14mm lenses and orient them landscape mode. I position one directly high Northeast and the other high Southeast. You can expect to see 50 to 100 meteors and hour.


The above was taken on manual (M mode) at f/2.8, ISO2000, 13 seconds. I shot it RAW so I applied some light and contrast in Photoshop.

Essential Equipment
If you want to photograph the Meteor shower you will need the following:
A camera (DSLR) capable of high ISO capabilities – The best choice will be a full frame DSLR like a Canon 1D/5DMKIII/MKII/6D, a Nikon D4/D3s/D700/D600/D800/D4, etc, and other brands of full frame cameras. Full frame sensor cameras are the best choice for capturing the shower because of their excellent high ISO performance. But the show would be easily captured as well with a crop sensor (APS-C size) like that of a Nikon D3100/3200/D5100/D5200/D7000/D7100/D90/D300(S), etc, or a Canon T2/T3/T4/T5/40D/50D/60D/7D, etc. As far as other cameras such as point n shoots or mirrorless (Like the Sony A7 series or any of the recent Fuji’s) are concerned, if they have the option to shoot in manual and set the exposure, aperture, and ISO, they should be able to grab something awesome.
A fast wide angle lens – Because of the dark sky, a fast (f/2.8 or faster) aperture lens would be preferable. The wider the view, the better. I’ll be using a 14mm lens. A wide zoom is fine too, but with most of those the fastest aperture is f/3.5 so you will have to compensate with longer exposures and/or higher ISO. You will also want to set your auto focus to OFF and then manually set the lens to the infinity focus setting. I use electrical tape to secure my focus ring so it doesn’t move if I accidentally touch it during the night.
A tripod – A good sturdy tripod is essential as you don’t want the camera moving during a long exposure. You will end up with nothing useful if you try shooting handheld.
A wired or wireless remote – Some photographers prefer to use a wired intervalometer/remote. This device allows you program and setup an automated continuous cycle of 30 second exposures. This is really handy if you don’t want to stand by your camera for hours hitting the shutter button over and over every 30 seconds. Some of the newer Nikons and Canons (and others) have built in intervalometers. Most DSLR’s have the option to use a IR (wireless) Remote and you might be able to pick one up at a local camera retailer for $20 dollars. However, if you don’t have any of the above, its really not that much work to setup a chair by your camera and just hit the shutter button every 30 seconds. 😉 To lighten my load when I’m out shooting the Milky Way or meteors, I dont carry a remote of any type. I just hit the shutter. If the tripod is sturdy, its fine.
Large Capacity Memory Card – You might end up shooting for a couple of hours or more. So you will want a large SD Card or CF card to store hundreds of photos. I shoot in RAW mode, so I use 64 gigabytes of memory.
Battery – Don’t forget to charge your batteries and maybe bring an extra because you might be shooting for hours. You can always pick up extras for most cameras at a local camera retailer.

How to shoot and settings
These are my settings and what I’ll be using. I cant speak to how your particular brand of camera settings are completed with regard to the below.
1. Get your cam on the tripod and lock it to your view (Northeastern sky, etc). Once you set your view, leave your camera and tripod in place. A lot of pro photographers stack their captures (10-15 at a time) and rotate each photo in Photoshop to match the stars as they move. If you see a photo with 12, 15 or more meteors, this is a stack and not a single shot. You just wont see 12 or more meteors in 30 seconds. David Kingham has an EXCELLENT video on how to stack photos: http://www.youtube.com/watch?v=u7JVwSX1iAg
2. Set your camera to manual (M) mode.
3. On the morning of Aug 13 there will be no moon, so start out with a setting of 30 seconds exposure time (Shutter speed).
4. Set your lens to its fastest aperture – Mine is f/2.8.
5. If using a zoom lens, set it to its widest point. 18mm, etc.
6. Turn off autofocus and set the lens to the infinity mark. Trick: If you dont know where infinity is, (DURING THE DAY) go outside and focus on something hundreds of feet away. Now, turn off autofocus and THEN very carefully tape (electrical tape, etc) your focus ring in place on your lens so it doesn’t get bumped/moved at night. You will not be able to autofocus at night.
7. Set your ISO. I’ll start out at ISO1600. I’ll take a few test shots and look at the exposure to see if its light enough. If a bit dark, I’ll bump my ISO to 2000 and keep going higher if needed. Ultimately I want to see stars and a bit of the landscape in my shot.
8. TURN OFF long exposure noise reduction (NR) in your camera. Why? If you have this turned on after a 30 second exposure, the camera will take an additional 30 seconds to apply the NR after EACH shot and you might miss a meteor. You can apply NR in post process.

About ISO
Every camera is different and you will need to experiment. Take a few photos and look at the result on your cameras LCD screen. Too Dark? Increase the ISO. Too light or over exposed? Lower the ISO or lower the shutter time to 20 seconds, 15 seconds, etc. If your fastest aperture is F/3.5 or F/4, etc., you will have to compensate with a higher ISO setting or keep the shutter open longer. For the really bright comets, ISO 200 or 400 will work just fine. For the barely visible comets, ISO 2000 or higher will be needed.

Finally. If you don’t have a camera or want to go through all of the above – just grab some chairs, your loved ones and go just sit and stare at the sky. Hopefully the weather will cooperate and we’ll have a clear sky to look at. Have fun.

5DS Handed Highest DxOMark Score for a Canon, But Still Trails Nikon and Sony

Via Petapixel

canon5dss
DxOMark published its sensor test scores for the 50.6-megapixel Canon 5DS and 5DS R DSLRs today, and the news is both good and bad for Canon shooters. On the good side, the cameras scored the highest scores (87 and 86, respectively) ever achieved by Canon sensors. On the other hand, they still lag behind the Nikon D810 and Sony a7R (97 and 95, respectively) in overall quality.
Here’s the score breakdown comparison between the 5DS, D810, and a7S:
comparisoncameras
“Sitting outside the top 20 in the rankings, the headline scores for the EOS 5DS suggest that it’s far behind the best sensors we’ve tested,” DxOMark writes.

The D810 and a7S handily beat the 5DS and 5DS R in color depth, dynamic range (at low ISOs), and low-light ISO performance.

“With its massive resolution and best results in print, the EOS 5DS and 5DS R are great solutions for photographers shooting at low ISO sensitivities for large scale prints,” DxOMark says, but if dynamic range is more important to you than 50.6 megapixel photos, there are better alternatives out there.

Albuquerque Comic Con 2015

This year Comic Con grew so much, they moved from a hotel to the Albuquerque Convention Center. Comic Con began in 1970 when a collection of comic, movie, and science fiction fans came together to put on the first comic book convention in southern California. Annual conventions can now be found all over the USA and abroad. Along with comic book professionals, you might film and media stars, illustrators, actors, and artists. Like most comic-book conventions, the Albuquerque Comic-Con features a large floorspace for exhibitors. I was surprised by how big the event was and now understand why is spans three days. Three floors of the Convention Center was being used by exhibitors and the fans. And the best part of the convention is always THE FANS and mostly why I went in the first place. Check out Albuquerque Comic Con at their FB page or their website:

FB: Comic Con Website: Comic Con

My 2014

Hi all!

Its been a pretty amazing year for me and my photography. I’ve really enjoyed all of your kind comments, likes (on FB), and engagement with my photography. Thank you so much. These are a few of my favorite photos. I selected them because of the hard work, fun, growth in my photography, and/or the memories they represent.

Bio Wedding

This was one of the shortest weddings I’ve ever photographed (about 1.5 hours) and was one of the most enjoyable. The wedding was held at Albuquerque’s beautiful Bio Park after hours. The guest list was small, and the ceremony was short, relaxed, and simple. The quiet and private environment made it easy to shoot and grab some photos of the Bride and Groom enjoying the moment and the excitement of their big day. 🙂